In the bathroom renovation, the installation of the wash basin is the most important, because when we stay, we will use the wash basin every day, and the quality of the wash basin installation will directly affect our use results. Let's take a look at the installation process of the wash basin and its precautions for your reference.

Wash basin installation process
1. The water supply and drainage pipes have been reserved before installation, and the steel bracket supporting the washbasin table has also been installed;
2. The decoration unit will finish the grinding of the tabletop according to the table cut diagram in the under-counter pot packing box;
3.Accurately cut the faucet mounting hole according to the size of the installed faucet and countertop;
4. Put the washbasin temporarily into the opened tabletop installation opening, check the gap, and make a mark;
5. After checking and verifying, place the washbasin on a flat surface. After applying the silicone sealing material to the upper edge of the washbasin, carefully place the washbasin under the table and align it with the mounting hole. Calibrate with the previous mark and press upwards. , And use the attachments of the basin and the countertop attached with the manufacturer to connect the washbasin with the countertop;
6. After the sealant has hardened, attach the faucet to the deck according to the requirements and procedures in the manual. Connect the water inlet and drain fittings.
Wash basin installation notes
1, install washbasin
To install a washbasin, you should draw a vertical line in the middle of the spout, measure the height upward from the floor, draw a horizontal line on the wall, draw a mark on the wall according to the width of the washbasin, and hit a diameter of 120mm. Deep hole.
Drain the bricks and other debris from the hole, insert the expansion bolts into the hole, and pry with the cement. The fine tubing should be hung up. Put the bolts on the rubber pads and eye sockets, and put on the nuts, and screw them to the appropriate pipe end. Head over the basin fixing hole. Place the washbasin on the rack to find a flat surface. Attach a 4 mm diameter bolt to a horizontal iron bar, insert the upper end into the mounting hole, and insert the lower end into the tube rack. Put on the nut and tighten until tight.
2, install cast iron frame washbasin
Vertical lines shall be drawn in accordance with the center of the discharge nozzle, and the height shall be measured upward from the ground. A horizontal line shall be drawn as a cross line, and the width of the basin shall be centered to draw a mark on the horizontal line. Each vertical line shall be drawn. Place the pendulum well and draw a hole with a diameter of 15 mm and a length of 70 mm. The lead rolled into a roll and cut into a hole. Use the screws to fasten the basket to the wall. Place the washbasin on the rack, open the bolts of the movable frame, pull out the movable frame, and hook the rack on the washbasin hole. Inside, tighten the movable frame screws again, leveling and aligning.

The relevant information about the wash basin installation was introduced here for everyone. I hope this article will be helpful to everyone. If you still have something you don't understand, you can leave a message to Xiaobian at the bottom. We will answer your questions as soon as possible.
Basin angle valve basin cabinet vanity basin basin house decoration matters needing attention
Epoxy Flat Ground And Mortar Floor
Scope of adaptation:
Electrical appliances, electronics, machinery, food, medicine, chemicals, tobacco, beverages, textiles, clothing, furniture, plastic, stationery and other manufacturing plant workshop cement or terrazzo floor.
Performance characteristics:
1, dust, moisture, wear-resistant;
2, easy to clean, fast construction, easy maintenance, low cost;
3, strong adhesion, good flexibility, impact resistance;
4, Epoxy thin coated floor thickness 0.3 ~ 0.5mm;
5,Epoxy mortar flat coating thickness of 1.0 ~ 5.0mm range.

Generally 3 to 5 years
Technical index:
|
project |
index |
|
|
Drying time |
Table dry |
≤4 |
|
action |
≤24 |
|
|
Adhesion (grade) |
≤1 |
|
|
Pencil hardness |
≥2H |
|
|
Impact resistance |
50 passed |
|
|
Flexibility |
1mm passed |
|
|
Wear resistance(750g/500r,weightlessness,g) |
≤0.04 |
|
|
Water resistance |
No change in 48 hours |
|
|
Resistant to 10% sulfuric acid |
56 days no change |
|
|
Resistance to 10% sodium hydroxide |
56 days no change |
|
|
Gas-resistant,120 "Anti-petrol,120". |
56 days no change |
|
|
Anti-lubricant |
56 days no change |
|
Construction Technology
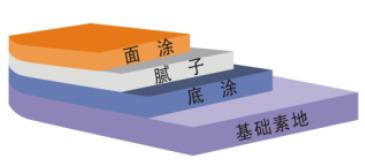
1, the base surface treatment;
2, brushing primer;
3, grant putty or mortar layer;
4, polished, vacuuming;
5, paint color paint;
Epoxy Flat Ground And Mortar Floor
Epoxy Flat Ground And Mortar Floor,Flat Painted Epoxy Floor,Light Grey Epoxy Flat Coating,Grass Green Epoxy Flat Coating
Jiangmen Kasole Building Materials Co., LTD. , https://www.kasole-paint.com
